Sunday, January 27, 2013

Home-made Hamburger Buns (Quick)

If you have never attempted home-made bread before, don't let this scare you off! YOU can make these...I promise! Next time you grill, surprise your family with these perfectly baked hamburger buns fresh from your very own oven.  It takes less then an hour and it is a perfect back-up if you forgot buns at the store.


Quick Hamburger Buns

2 Tbsp active dry yeast
1 cup plus 2 Tbsp warm water
1/3 cup olive oil
1/4 cup sugar
1 egg (room temp eggs work best)
1 tsp. salt (I like Kosher salt)
3 to 4 cups flour (I use basic white flour)

Directions:
1. I like to use a glass bowl to dissolve yeast in the warm water. Add your sugar and oil here and let stand for 5-10 minutes. 

2. Add the egg, salt, and enough flour to form a soft dough (should not be sticky).

3.  Roll onto a floured surface and knead until smooth, about 3-5 minutes. (I put butter on my hands to help keep dough from sticking to me and form together better). You do not have to let it rise.

4. Divide dough into 12 balls and place on a greased stone-ware (or cookie sheet) about 3 inches apart.

5. Cover with a tea towel and let rise for 10 minutes. Bake at 425 for 19-12 minutes or until a golden brown color on top. I like to rub some butter and garlic salt on top for flavor when they are almost done browning in oven.

I love to serve these warm with burgers fresh off the grill... Yum, taste so good every time. These are a bit heavier then your typical white flour 99 cents buns from the store, but I think you'll enjoy the difference! Serve with a smile....and enjoy with your crew!


Monday, January 14, 2013

Sweet Blueberry Muffins

Looking for an easy, but oh so tasty home-made muffin recipe? This will honestly take you 10 minutes to throw together and another 20ish to bake. Make it in the morning, take your shower, and they will be done when it is time to feed the crew. This is also a yummy option for afternoon guests or an after school snack or over-night guests! I love fresh blueberries and when I find a good price on them I stock up my freezer. Those come in handy for days like today...


Sweet Blueberry Muffins

3 cups flour
1 cup sugar (I use only 3/4 cup for mine usually)
4 Tsp Baking Powder
1 Tsp salt
1/3 cup buttermilk
1/3 cup milk
1 Tsp lemon juice
1/2 cup vegetable oil
2 large eggs (fresh from your backyard chickens if you have them!)
1-2 cups fresh or frozen blueberries
2 Tbsp Sugar (for sprinkling before you bake them)

Heat your oven to 400. 

Combine your dry ingredients in a large bowl, make a well in the center and add rest of your ingredients  Fold your blueberries in last. This will be a thick batter, just moistened enough to mix all your ingredients. Spoon into a well greased or paper-lined muffin pan. (I highly recommend investing in a good stone muffin pan for perfectly baked muffins every time! I love my Pampered Chef!) Sprinkle tops of muffins with a bit of sugar.

Bake at 400 for 20-25 minutes. Muffins should be a light golden brown. Makes 12.


Serve 'em up with a smile...and enjoy sweet blueberry goodness!


Saturday, January 12, 2013

Garlic Chicken Pasta

Here's a little background information about me...I waitressed my way through college at one of the best family owned restaurants in town. Five years at one place and I still love going back. The Brown Bottle taught me a lot about taking care of people well during their dining experience. I actually loved this job, despite long hours on my feet and up and down the stairs, but mostly loved the people that mentored me through those years of my growing up. Today it is still, in my opinion, the best place to eat in town and I still love the owners and manager!  

The Brown Bottle's garlic chicken is my absolute favorite dish there and I would never even come close to preparing such a fine dish...but I did attempt to make a close version of it for my own taste bud's sake. I am happy with the outcome, but if you want the real deal...head on over to the Brown Bottle in Cedar Falls!! You'll get the best service and food in town! But if you want a meal at home...may I suggest trying this?

Garlic Chicken Pasta

1 double breast of chicken

veggies of choice: (for this batch I used)
1 green bell pepper
1 small head of broccoli
half bag of baby carrots
fresh mushrooms
(could use: onion, tomatoes, pea pods, yellow bell peppers, zucchini)

pine nuts (1 small bag or about 1 cups worth)
olive oil
fresh ground pepper
garlic salt
garlic powder
1 box of angel hair pasta

Dice your raw chicken and sprinkle with garlic salt. Pour 1 Tbsp of olive oil in a large skillet. Once oil is warm, throw your chicken in and cook evenly for a white but not brown look. Once chicken is all cooked through, set your chicken aside in a separate bowl for now.

Boil your water for your pasta at this time and toss your noodles in the boiling water to cook as you start your veggies.


As your chicken cooks, slice your veggies to your liking. I slice my baby carrots in fourths to help them cook faster. 


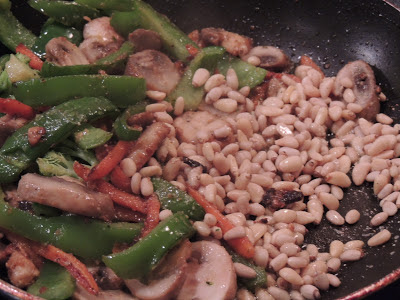
Add another Tbsp of olive oil to your skillet and add your more dense veggies first. I add my carrots and let them saute for a bit, then add my peppers, next my broccoli, and last my mushrooms. This way I don't have some veggies overly done while my heavier veggies finish cooking through. As my veggies cook, I sprinkle with pepper, garlic salt, and garlic powder to my tasting. Season away as you please! 

Once all my veggies are done, I throw in the pine nuts to toast for just a couple minutes. You might need to add a bit more olive oil if it seems dry or your veggies are sticking to the bottom of your skillet.


Your noodles should be ready to drain by now and your veggies are done. Throw your chicken back into the skillet, drain noodles, and simply toss the skillet veggies and chicken with your noodles. 

 You should have yourself a light pasta dish ready to eat right away! I had no problem serving this dish with a smile and fully enjoying! Yum!!


Thursday, January 10, 2013

Cheesy Potato Soup

If I lived by myself, I would live off of soup. But, I don't (thank goodness), so I have a hand full of soup recipes that I love and can even convince my house full of boys to enjoy for a meal or two with me! Soup is my go-to meal on weekends in the winter. You can throw it together in the morning and it is warm in the crock-pot all day. My husband says cheese is the compliment to every dish...so this cheesy potato soup might be towards his fave of the soups I place before him when I am sure he would rather have meat and potatoes!! I have been making this for years and it never disappoints. I hope you'll give it a try.

Cheesy Potaoe Soup
1 1/2 cups chopped carrots
1 1/2 cup chopped celery
5-8 cups diced potatoes (I like thicker soup, so I do more potatoes)
2 tsp. salt
1 can evaporated milk
2 Tbsp fresh parsley (or flakes)
1 cup milk or half & half
1 lb Velveeta cheese 
1/4 cup butter
2 cup cubed ham or bacon (we prefer ham)
pepper (to your tasting)


Chop all your veggies and place in a soup pot.


Cover your veggies just enough so the water is barely covering it. Add your salt and boil this for about 20 minutes.  Mash your potatoes just a bit as you stir it.


Turn the heat off and add all your remaining ingredients.


Turn your heat on medium and bring to a bubbley stage. once it is bubbely, turn to low and stir occasionally. 


I like to let it sit for awhile to thicken, but you can eat it right away too!


Mmm-mmm...and as always, serve with a smile and enjoy :)