Monday, December 31, 2012

Frozen Hot Chocolate!

I don't know why I never attempted this before? I have heard people rave about it all the way from New York's famous Serendipity and I love a good hot chocolate ...so why did I not think of this before!?!? Well, good thing it's never too late and we made a quick run to our local all night grocery store last night to create this oh-so-tasty masterpiece before we snuggled in for a movie. Worth spending an hour reading about different recipes, worth going out into the cold to get just perfect ingredients, worth making mess in kitchen after all other dishes were done for day, and worth baby making art with it all over the table as the rest of us indulged. If that doesn't convince you...just make it, you won't regret it! It is really too easy and too tasty not to.


Frozen Hot Chocolate

2 cups whole milk (I would not exchange with anything different)

Five 1.25 ounce packets of Hot Chocolate mix (You can do less, but we loved it with five)
4 cups ice
1 cup heavy cream
2 1/2 tablespoons granulated sugar
mini chocolate chips
Chocolate syrup
I have a really nice blender, so it made the ice blend into a perfect consistency.  Use the highest powered blending machine you own! Simply pour your whole milk and hot cocoa packets into blender. Blend well. Add your ice and blend until a whipped like frozen consistency. You will have yummy ice crystals gathering to top. 
Once this is done, pour your heavy whipping cream into a bowl large enough to use your hand mixer in. Add your sugar and blend until you have home-made whipped topping! You could swap for ready made Cool Whip, but I promise this extra step is worth it!
Give your frozen chocolate mix a quick last minute blend and pour into cups, spoon a big dallap of whipped topping on it, sprinkle with mini chocolate chips, and drizzle chocolate syrup over it. And as always, serve with a smile and enjoy!!!
(This serves about 4-5 people...we doubled it :)

Tuesday, November 13, 2012

brrr...it's Chili!

As the cooler temps have settled in to stay, most find a big of pot of chili resting on their stove-top. If you haven't yet, now is the time to try it! Chili is one of my favorite soups to make because a.) it's filling b.) it's good and c.) it's easy. Served with some home-made cornbread and you've got yourself a real treat for a few days! The beauty of it too, is that you can pretty much do whatever you want with it. Make it simple or zesty as you please...it turns out different every-time here and that's just the fun of a good chili "recipe".

Mama's Chili

1lb ground beef
1lb pork sausage
hand full of carrots
few celery stalks
1 red onion
1-3 peppers (I used sweet peppers this round)
purple cabbage (only because I needed to use it up)
1-2 can red kidney beans
1-2 cans chili beans
tomatoes (This can vary)
I used 9 frozen tomatoes from my garden, just puree them
2 cans tomato soup
2 cans diced tomatoes
dash of garlic salt or powder
chili seasoning to taste

Simple chop all your veggies and cook over medium heat with your beef and sausage. Once this is all cooked through, start dumping in your tomato varieties and beans. Once you have the consistency you'd like (some like more liquid, some like thick chili), add your seasoning. Let it simmer for an hour for best results and eat with warm cornbread! As always, serve with a smile and enjoy! (Best enjoyed with friends added to your table too...just sayin!!)


 As much as I can, I get veggies into my meals. Chili is just too easy to sneak a little or a lot in!

 Cooking your veggies with your meat is a must to get the desired non-crunch feeling in your mouth.

 There are so many bean and tomato varieties... get creative and use whats in the cupboard!

 I love, love fresh garden tomatoes pulled from my freezer for winter cooking!! It adds so much real flavor.

Now, don't be like me...I burnt this batch. Awful, just awful. Another easy option is to throw it into a crock-pot for the day...no burning and plenty warm for dinner still.

Friday, November 2, 2012

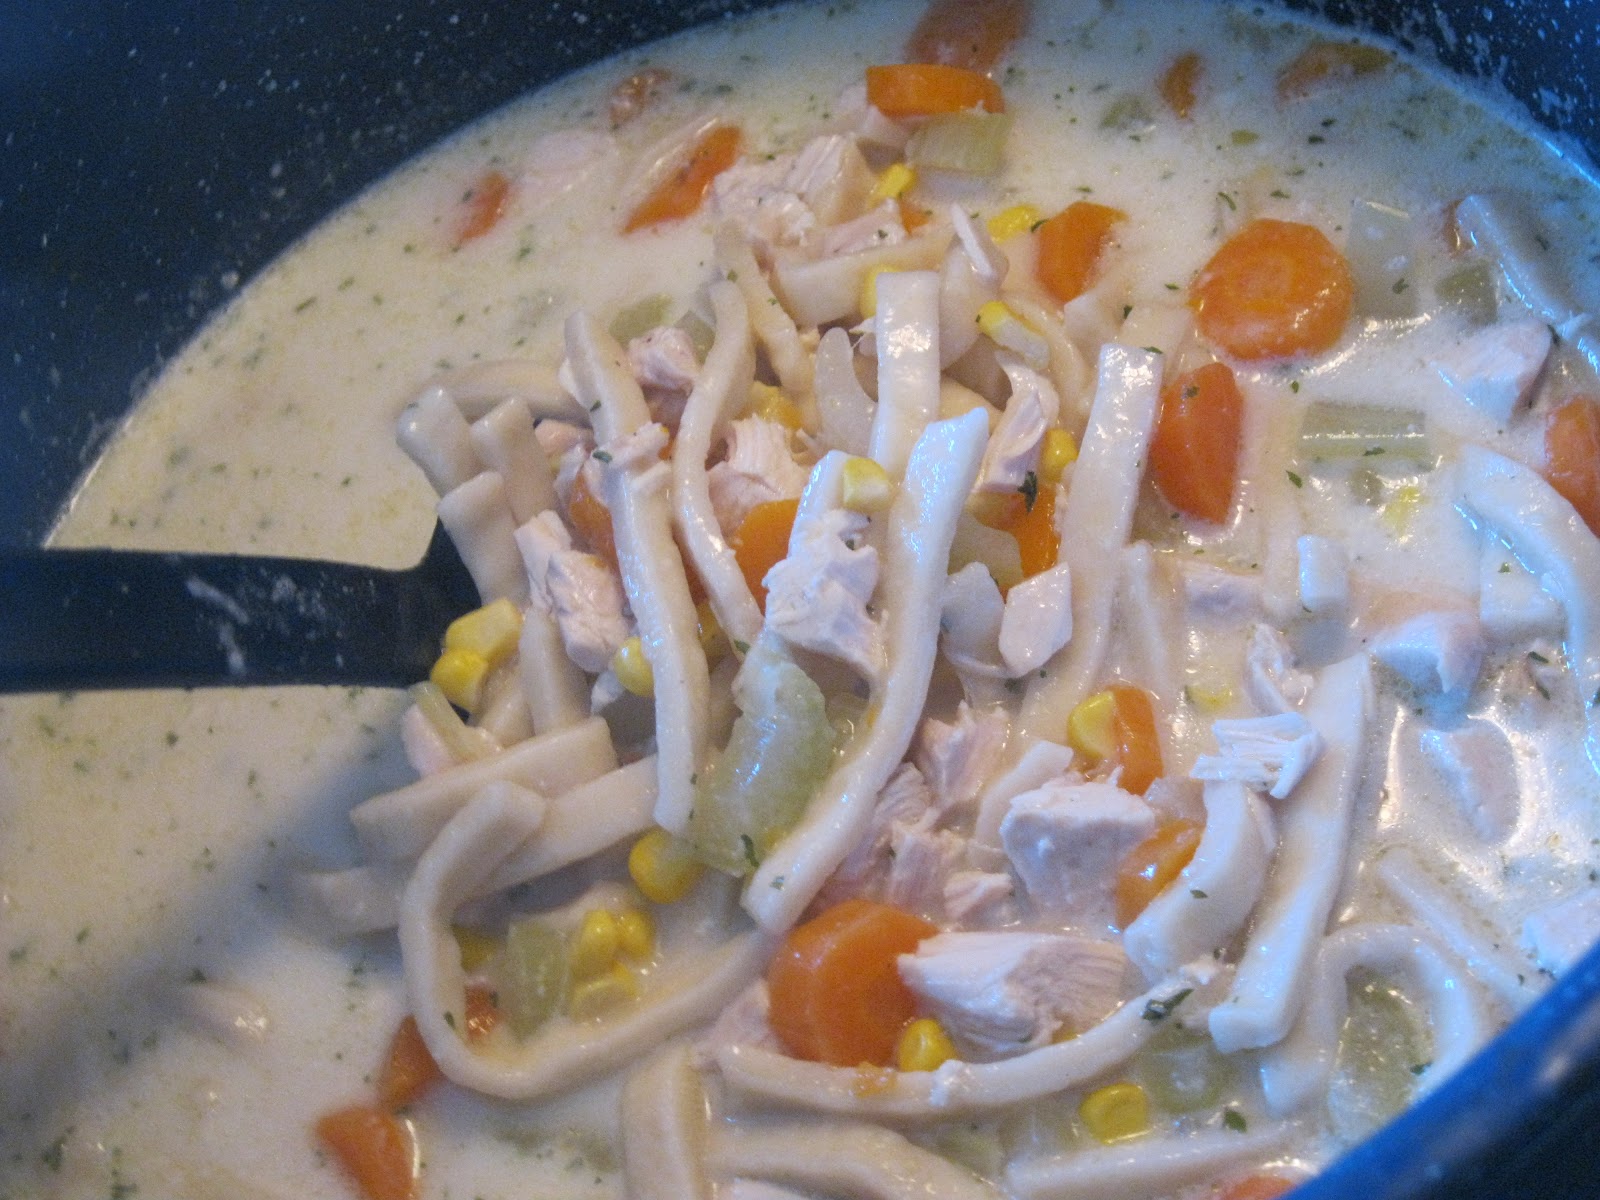
Mama's Chicken Noodle Soup

I love food. I was going to type I love fall foods, but then come spring I would write I love fresh spring salads and come summer I would write I love summer foods with grilling and sweet corn. So I might as well be honest and just say...I love food, all seasons of it. Food leaves a taste in your mouth and memory from when you ate it and with who and what is represents. The way cherry cheesecake makes me think of my grandma's table and eating it after many of her yummy meals and ham and potato soup reminds me of my other grandma's house on Christmas day and home-made bread makes me think of my mama in her own kitchen. Food for me is a connection to many hearts in my life and with it I hope to do the same. Food brings people together and good food keeps people coming back!  Good food and good people...doesn't get much better!

With fall comes my taste buds ready for soup season. I personally could live off soups this time of year, but my house full of growing boys would tell you something very different. I have made a variety of the basic chicken noodle soup and this one is my favorite. I never make two soups the same, so bear with me as I walk you through this one...one of my weakness's....I never write my recipes down as I make them and often can't remember what exactly I did. Just tweak this a bit to your tasting as you go :)

Mama's Chicken Noodle Soup
1 bag frozen chicken breasts or tenderloins 
olive oil
kosher salt
fresh ground pepper
fresh or dried parsley
chicken broth (anywhere from 3-6 cups)
carrots
celery
Reames frozen home-made noodles (Do not use anything else! These are the best, I promise! I think the Amish would even agree :)
heavy whipping cream 


Begin by baking your chicken. I put olive oil on a good stoneware pan, lay my frozen chicken out, and sprinkle with salt and pepper. Bake at 350 just until chicken turns white. Do not over cook or it will be tough meat in your soup.

In a pan large enough to hold soup, pour in your chicken broth. I use 2-3 boxes depending on how much I want to make. Then start adding your veggies...


I almost always use carrots and celery, but sometimes I just clean my fridge out too with left-over veggies like corn or peas. Chop your veggies and throw into pot of broth. Let cook until carrots are tender. As your veggies cook throw in some seasoning...I like kosher salt, fresh ground pepper, and some freshly chopped parsley. You could use anything you like though and even add some onions if you wish.


This is where you must follow exactly, the only thing I always do the same. use Reames frozen home-made egg noodles. I can't even make home-made noodles that taste this good. I love these. I will say it again, I love these. Once your veggies are tender, pour a bag of these tasty things in your soup. While they soak up some juice, you have two options...1.) leave your soup as is with broth. 2.) Give it a creamy taste and texture by pouring in some heavy whipping cream. I usually do about 1- 1 1/2 cups. Its the good stuff!


Your soup is ready to enjoy once the noodles are cooked and it's nice and hot! As always, serve with a smile and enjoy!!!


Thursday, October 11, 2012

Favorite Pumpkin Bars

It's pumpkin season!! Whoo-hoo! I love baking in October. Windows slightly opened, kitchen warm from toasty oven heat, fall colors coming through the windows, candles burning, piano music humming from the ipod. Anything pumpkin makes the house smell amazing and the mouths water. Welcome fall!!  These bars are a result of some of the first recipe experimenting I did over 10 years ago in the little kitchen my husband and I used while we lived in our church's old parsonage apartment. There was a variety of cook-books left in that old kitchen and I had so much fun flipping through them and trying some recipes on my new little family...my man and me. After trying a few pumpkin bar recipes, I tweaked a couple to come up with this one...my favorite.  And wah-la...one of my first creations as a home-maker.  
These are simple and oh so tasty. If you bake anything pumpkin this fall, I strongly suggest these! You won't be sorry!

Pumpkin Bars
4 eggs
2 C sugar
1 can pumpkin 
1/2 tsp Cinnamon
1/2 tsp nutmeg
1 C Oil
1 tsp baking powder
1 tsp baking soda
2 C Flour

Mix together eggs, sugar, pumpkin, cinnamon, nutmeg, and oil. Add remaining ingredients and blend well. Bake in greased 15 by 10 pan (stone-ware works best!) and bake at 350 for 25 minutes.

Cream Cheese Frosting
1- 8oz pkg. cream cheese
1/2 C margarine, softened not melted
3 1/2 C powdered sugar
2 1/2 tsp vanilla 

Cream all ingredients together until smooth, should not be lumpy. Spread over cooled bars.

 I actually added this recipe to our church recipe book years ago. I think it was my only addition to the book!

 If you have stoneware, I strongly encourage doing your baking in it. It makes such a big difference for even baking and no burnt bottoms. Big fan of Pampered Chef stoneware!

  Mmmm, this frosting is everything tasty and nothing lite :) Don't say I didn't warn you!

 Once these are frosted they last about 1-2 days here...

And off they go to neighbors and kids mouths and friends and family. Share the fall love! And as always, serve with a smile and enjoy!!

Friday, September 28, 2012

Multigrain Hot Cakes

Brrr, cold mornings make me crave something warm to put into my tummy. I've been playing with multigrain hot cake recipes to replace my basic white flour pancake recipe. My boys eat pancakes, they are easy to make big batches of batter, and they are a good solid breakfast food when loaded with some good grains and a few veggies snuk in. Whip this together in seriously like 15 minutes...save the extra batter in the fridge and have fresh hot cakes a few days in a row!

Multigrain Hot Cakes
2 cups white flour
1 cup wheat flour
1/2 cup cornmeal
1/2 cup rolled oats
4 Tbsp brown sugar
4 tsp baking powder
1/2 tsp salt
3 cups fat free milk
6 Tbsp canola oil
2 Tsp vanilla
2 eggs
4-6 Thawed Cubes Mama Made fruit or veggie of your choice (optional) ~ we love apple/pumpkin flavors added!

Simply dump all your ingredients into a mixing bowl. Mix well and let sit for 5 minutes before you bake over a hot skillet on low to medium heat. Serve with warm maple syrup pr honey...a smile too...and enjoy!


Thursday, September 20, 2012

Pretty in Pink Parfaits

Some mornings are just busier then others and getting everyone out the door by 8:30 can sometimes feel like a mini marathon. So.Many.Details!!  There are mornings where my hair-washing goal or the extra time to shave my legs quickly get bumped off the morning to-do list, but sending everyone off with a full tummy and eating well to start the day just doesn't happen here. I truly think breakfasts is one of the most important meals of the day and my kids brains and bodies need that boost to start well. So even on the days we are going a little faster pace then most mornings, I try to keep some basics around the house to throw these together. You probably have almost everything you need as I write this and if you don't...get creative with what you do have :) It's got all your basic breakfast items all made into one easy to take in the van jar!

Pretty in Pink Parfaits
Starting with the bottom layer:
cheerios
strawberry yogurt
crushed frozen strawberries (use your blender "ice crush" mode)
vanilla yogurt
granola
crushed frozen raspberries
strawberry or raspberry yogurt
crushed frozen berries

*You could totally use a variety of fruit, cereals, or yogurts.
Serve with a smile and enjoy!


Tuesday, September 4, 2012

it's apple season!

While I love the season of grilled food every night and fresh veggies from the garden, I also must admit...I love fall foods. Or maybe I just love food? Either way, apple season is here! Down at market the apple farmer made his appearance for the first time this last weekend, so it's safe to say the fall's finest dishes can start being made to enjoy! Between applesauce and apple dumplings and apple crisp comes the most looked forward to apple dish in our home..apple pie :) Probably my husband's favorite dessert I make, next to strawberry pie and for sure a must to smell up the house real nice and serve at the end of the back-yard dinner meal. And the best part? You can make this....fairly easily! (yes, YOU, who have never attempted a home-made pie!!) I promise! So gather your apples and warm up that oven. Fall is ready to visit your table!

Easy Crust
1 cup flour
1/2 cup crisco
1 Tbsp butter
1/4 cup very cold water

Apple Pie Filling
5 cups of peeled, sliced, and rinsed Granny Smith apples
1 cup sugar
2 Tbsp flour
1/2 tsp. cinnamon (I think it's around 1/2 tsp...I just sprinkle some in)
dash of nutmeg
dash of salt
2-4 Tbsp butter (slice and place on top of filling before you lay top crust in)


I think the best apple pie apples are Granny Smith, but any apple can do the job.

I like to add my crust ingredients together in my glass mixing bowl and knead together. Once it is fairly mixed I dump the pile onto a floured surface and knead away the rest until I have a nice round ball of dough. (and I double this crust recipe for two pie crusts)

Once your ball of dough is not too sticky that it sticks to the rolling pin, but not too dry that it crumbles, you are ready to roll out those crusts! You can do this...seriously.

I sprinkle a little flour on the top of the dough ball and roll out in each direction until big enough to fill the pie pan. Roll both crusts out. Lay your first one in the pan and set the 2nd one aside for the top.

Pinch your crusts down against the edge and leave just enough to pinch the top crust together when you are done filling it. You will have a little hanging over the edge of your pie pan.

Next, prepare your filling. Slice your apples and throw together with sugar, flour, nutmeg, salt, and cinnamon.

Set your butter pats on top.

Lay your top crust on top and cut along edge of pie pan to get rid of extra crust. Pinch together or use a fork to mold two crusts together.

Poke a cute design or poke at least a few air holes to let it breathe while it bakes.

Bake in your pre-heated oven at 400 degrees. If you time it well, put it in an hour before your hubs gets home from work... who doesn't love to walk into an apple pie scented house?

And the best part! Serve with a smile and enjoy! Happy pie making mama's!!